Master the art of click tracking on your website with Google Tag Manager. From outbound links to button interactions, uncover valuable insights into user behavior to optimize your site’s performance and user experience.
One of the most direct ways to gauge user engagement and preferences is through click tracking. By monitoring how users interact with various elements on your site—from outbound links to buttons and forms—you can gain valuable insights into their journey, preferences, and the effectiveness of your content and calls to action.
Why Click Tracking Is Essential
Click tracking transcends mere observation; it’s an analytical approach to understanding the nuances of user interaction on your website.
Each click, whether on an internal link, a navigation button, or an outbound link to a partner site, offers a story of user engagement and interest. Such insights are invaluable in refining your website’s layout, content strategy, and conversion paths, ensuring they align with your audience’s needs and preferences.
Implementing Click Tracking in Google Tag Manager
The implementation of click tracking in GTM begins with a well-thought-out strategy. Identifying the clicks that offer the most value to your analysis is crucial. Whether your focus is on tracking outbound links to assess partner engagement or monitoring “Add to Cart” button clicks to understand purchase behavior, each tracked click should serve a specific analytical purpose.
Configuring Click Triggers
GTM simplifies the process of setting up click tracking through the use of triggers. You can choose between “All Elements” for tracking any click on your site and “Just Links” for focusing on navigational interactions. For more detailed tracking, such as distinguishing outbound from internal links, GTM allows you to create specific triggers that filter clicks based on URL patterns or element attributes.
Utilizing Built-In Variables
To capture the context of each click, GTM provides a range of built-in variables, including Click ID, Click Classes, and Click URL. Activating these variables enables you to collect detailed information about the clicks, facilitating a deeper analysis of user behavior.
Creating Tags for Analytics
With triggers and variables in place, the next step is to create tags that send click information to your analytics platform. Whether you’re using Google Analytics Universal or GA4, GTM’s tag configuration options allow you to define the type of event (e.g., “outbound_link_click”) and specify additional parameters for a more granular analysis.
The Most In-Depth
Google Tag Manager Course
With 21 Real Examples For eCommerce Including: FB, GA4, LiN Pixels, Button/Link Clicks, Custom Dimensions and much more.
Setting Up Click Tracking: A Step-by-Step Guide
Click tracking in Google Tag Manager can be segmented into two main categories: tracking external (outbound) link clicks and tracking internal interactions such as button clicks. Here’s how to set up each type of tracking to gain comprehensive insights into how users interact with your site.
Tracking External (Outbound) Link Clicks
Outbound link clicks are interactions where users click on links that lead them away from your site. Tracking these can help you understand which external links are most engaging or valuable to your audience.
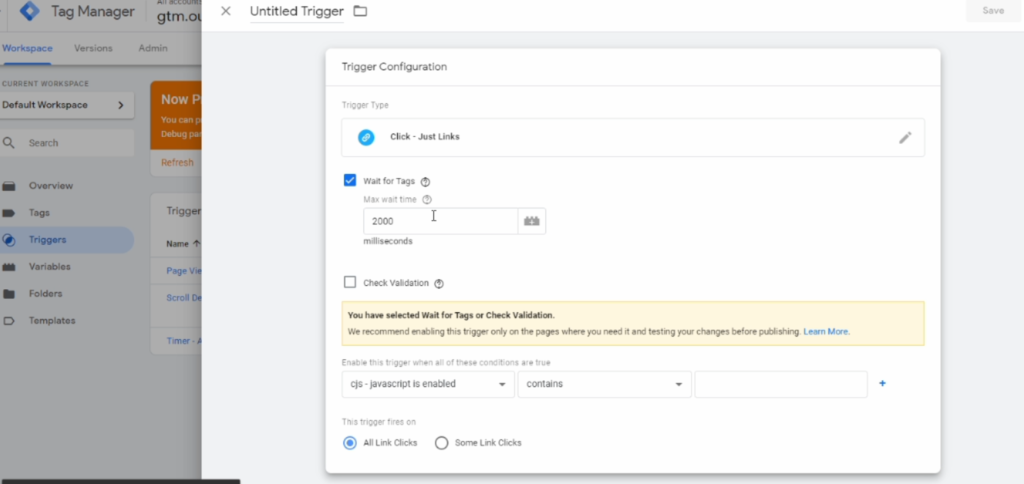
Create a New Trigger for Outbound Links
- In GTM, navigate to “Triggers” and click “New.”
- Choose “Just Links” as the trigger type.
- Enable “Wait for Tags” to ensure tags associated with this trigger have time to fire before the user is taken to the outbound link.
- Under “This trigger fires on,” select “Some Link Clicks” to specify conditions for outbound links.
- Use the built-in variable “Click URL” and set the condition to “does not contain” your domain. This will ensure the trigger only fires for links leading away from your site.
- Name your trigger (e.g., “Outbound Links”) and save it.
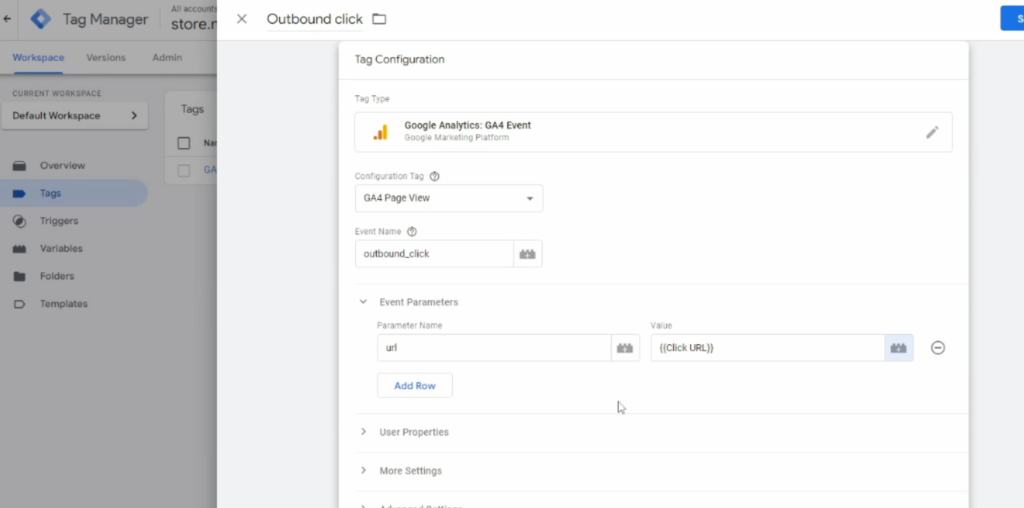
Configure a Tag to Capture Outbound Clicks
- Create a new tag with the desired Analytics platform as the tag type (e.g., Google Analytics).
- Set the track type to “Event.”
- Configure the event tracking parameters to capture outbound link clicks (e.g., Category: “Outbound Link”, Action: “Click”, Label: “{{Click URL}}”).
- Select the outbound link trigger you created as the firing trigger for this tag.
- Name and save your tag.
Tracking Internal Interactions (Button Clicks, etc.)
Tracking internal interactions such as button clicks involves identifying clicks within your site that don’t necessarily lead to a new page but are important user actions (e.g., “Add to Cart” buttons, and form submissions).
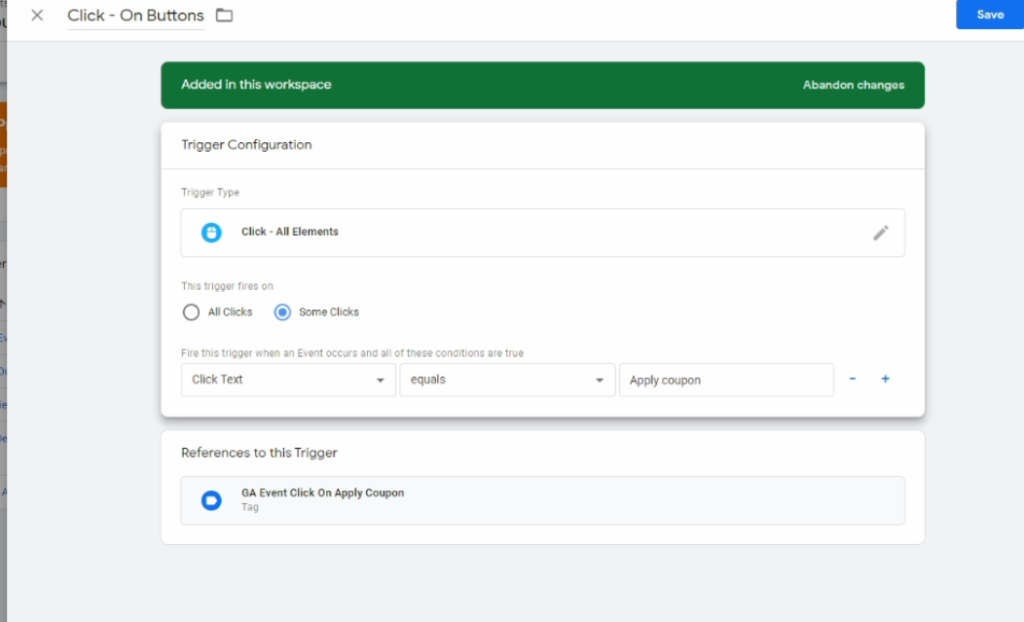
Create a New Trigger for All Elements
- In GTM, go to “Triggers” and click “New.”
- Choose “All Elements” as the trigger type for capturing all clicks on the site.
- Under “This trigger fires on,” select “Some Clicks” to define specific conditions for button clicks.
- Use variables like “Click Classes,” “Click ID,” or “Click Text” to specify the buttons or elements you want to track. For example, if you’re tracking “Apply coupon” buttons, you might use “Click Text” equals “Apply coupon.”
- Name your trigger (e.g., “Button Clicks”) and save it.
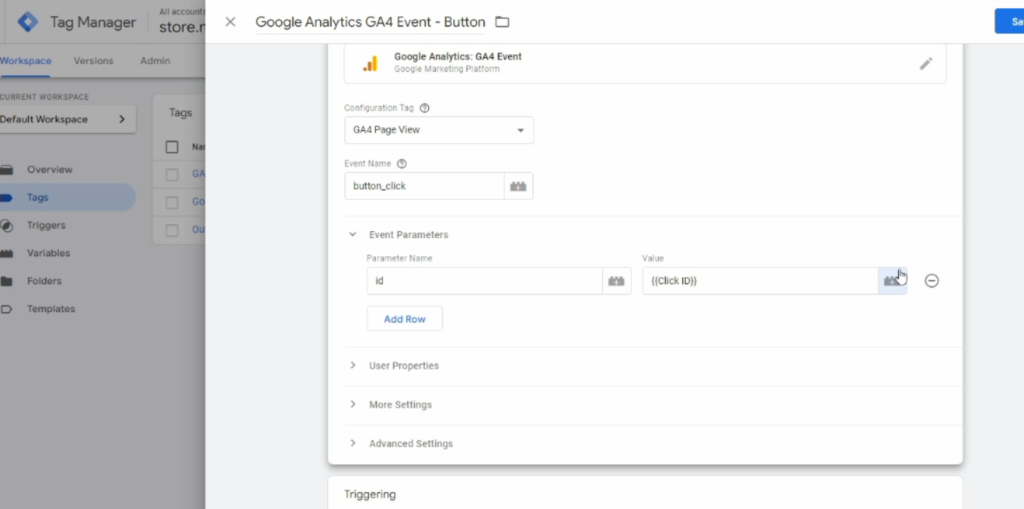
Configure a Tag to Capture Internal Clicks
- Create a new tag with the desired Analytics platform as the tag type.
- Set the track type to “Event.”
- Configure the event tracking parameters to reflect the internal interaction (e.g., Category: “Button”, Action: “Click”, Label: “{{Click Text}}”).
- Select the trigger you created for internal clicks as the firing trigger for this tag.
- Name and save your tag.
Advanced Best Practices for Click Tracking
- Prioritize Meaningful Clicks: Avoid the temptation to track everything. Focus on clicks that provide actionable insights into user behavior and site performance.
- Employ Descriptive Naming Conventions: Clear naming for your tags, triggers, and variables aids in managing your GTM setup and ensures easy identification of each component’s purpose.
- Test Thoroughly: Before finalizing your click tracking setup, use GTM’s preview mode to test the functionality. Ensure that tags fire as expected and that the data collected is accurate and relevant.
Conclusion
Click tracking with Google Tag Manager opens up a world of insights into how users interact with your website.
By strategically implementing click tracking, you can unveil patterns in user behavior, optimize your site layout and content, and enhance the overall user experience.
Remember, the key to successful click tracking lies in thoughtful implementation, rigorous testing, and continuous refinement based on the insights gathered. Embrace the power of GTM click tracking and transform user interactions into actionable insights for your website’s growth and success.